
Tracked vehicle construction?
-
LeChatNoir

- Posts: 5907
- Joined: Mon Sep 01, 2003 8:52 am
- Location: Louisville, Ky
-
dragonfly Jafe
- Posts: 1877
- Joined: Tue Sep 02, 2003 11:08 am
- Location: the Oregon Trail

-
Tiahaar
- Posts: 1142
- Joined: Sat Sep 20, 2003 9:13 pm
- Burning Since: 2003
- Camp Name: Starship Palomino
- Location: Mojave Desert, CA (also Forever via Pandora)
oooo me like!
Yeah, attachment chain!!! Dude you are rocking now. I am still hunting for my chain but two weeks ago retrieved the chassis that will become my EXERTRAK from Van Nuys and started work! Gotta keep from falling too far behind. First was to take the thing apart then start adding the cyborg stuff in...first was a big sprocket where the power will feed out to the transaxle, which is currently awaiting new shift keys so I can put it back together.


Burning Man 2003-25; Desert Carillon, HypnoHorse, Ulaume's Chimes, Iron Native, Black Rock Solar, Portal Collective, Center Camp Café Stage and Sound Tech, 747 Project
Starship Palomino
Starship Palomino
-
Tiahaar
- Posts: 1142
- Joined: Sat Sep 20, 2003 9:13 pm
- Burning Since: 2003
- Camp Name: Starship Palomino
- Location: Mojave Desert, CA (also Forever via Pandora)

http://cgi.ebay.com/Lot-of-95-of-Attach ... dZViewItem
YEAH Found my attachment chain! And yes that's a pallet its sitting on there, 1200 pounds shipping from Florida to California will be a bitch but its just what I need...BF111 4 3/4" pitch with K attachments for making a super tank track
Heheh April Fools...that stuff would be a bit toooo big for my project!!
Burning Man 2003-25; Desert Carillon, HypnoHorse, Ulaume's Chimes, Iron Native, Black Rock Solar, Portal Collective, Center Camp Café Stage and Sound Tech, 747 Project
Starship Palomino
Starship Palomino
-
dragonfly Jafe
- Posts: 1877
- Joined: Tue Sep 02, 2003 11:08 am
- Location: the Oregon Trail
just got back from the Kinetic Sculpture Racing seminar on building bicycle powered madness. Also got to play with Bob's dual-wheel thingy (very impressive!)
I highly recommend this seminar to anyone bicycle-ey inclined in their engineering. It is only offered once a year, but hopefully soon the material will be put on the web.
I am now convinced a bicycle powered tank is feasible. The differential steering will work, possibly better than I had hoped. It will not go fast, my original goal of a top speed of 5mph is probably not going to happen (unless I can get a few guys with yellow jerseys for my crew!).
I will have to see what sprockets are available and start playing with my gearing and everything now...one general rule is that you want a low gear of "5" for mud and sand (typical mountain bikes are maybe 12-100), which means a second gear stage is essential (maybe even a 3rd).
The second stage must be much stronger than bicycle stuff (KSR racers break bike chains all the time)
I have a video of the differential steering, I'll try to post it on the web somewhere for anyone that is interested.
Talent hits a target no one else can hit; Genius hits a target no one else can see.
Arthur Schopenhauer
Arthur Schopenhauer
-
dragonfly Jafe
- Posts: 1877
- Joined: Tue Sep 02, 2003 11:08 am
- Location: the Oregon Trail
the bikes I am using have the following sprockets (all in number of teeth of the sprockets);
front: 48 - 38 - 28
rear: 28 - 24 - 20 - 17 - 14
assuming 60 rpm pedalling (with 100 rpm for emergency power mode) and an 8" drive sprocket dia, the lowest gear would provide 8 gear inches and the highest would provide 27.
(28/28 * 8 inches = 8 inches , 48/14 * 8 inches = 27 inches)
speed would be 1.4 mph in low gear (assuming 60rpm) and 4.9 mph in high gear. But I don't think 8 is a low enough gear for a tracked vehicle.
So I will add a second stage, I want maybe two gear ratios so I can fiddle and see which works best. One for greatest torque (but lowest speed) and the other for greatest speed (with reasonable torque). Fortunately there are many gears above if it is possible to go faster (or a guy named neil joins the team).
so maybe an 3/8 and a 5/8 second stage gear ratio (say 12 teeth / 32 teeth and 15 teeth / 24 teeth). That gets me a low end of 3 gear inches or 5 gear inches and a high end of 10 gear inches or 16 gear inches.
Speed-wise that yields (again assuming 60 rpm) .5mph - 1.5mph with the lower gear setting or 1mph-2.5mph with the high gear setting. Of course, if I don't need that much torque, I can eliminate the second stage, but I have a feeling I will need it!
Turning will be by differential steering using a second drive system that is hand cranked. As you are steering differentially, and in fact since 1 track is getting positive and the other negative, the speed is effectively doubled. This plus the width of the vehicle combine to make it not so hard to get an effective turning speed. I am hoping to be able to spin 180 degrees in place within 15-20 seconds, or a 90 degree turn in 10 seconds or so. With a top estimated speed of 2.5 mph (around 4 feet a second) that means a 40' turn radius at top speed (BRC city streets are 30' wide).
I will probably also add disc brakes (for emergency stops) to allow skid steering also. I assume friction will bring it to rest fairly quickly even at it's top rated speed. But someday it may be on a hill going down....
Talent hits a target no one else can hit; Genius hits a target no one else can see.
Arthur Schopenhauer
Arthur Schopenhauer
-
dragonfly Jafe
- Posts: 1877
- Joined: Tue Sep 02, 2003 11:08 am
- Location: the Oregon Trail
here is the finished mock-up of all the axles and gears needed. There are two chains that will need gaurds (one for sure!), the rest appear to be out of the way. Also, everything can be worked on, etc, if needed.
I couldn't figure out an easy way to attach the sprocket to the hubs, so I just welded it. Hope I don't have to replace it!

I couldn't figure out an easy way to attach the sprocket to the hubs, so I just welded it. Hope I don't have to replace it!
Talent hits a target no one else can hit; Genius hits a target no one else can see.
Arthur Schopenhauer
Arthur Schopenhauer
-
dragonfly Jafe
- Posts: 1877
- Joined: Tue Sep 02, 2003 11:08 am
- Location: the Oregon Trail
only a few hours without rain today, but I put them to good use! I added the left seat (adjustable +/- 6" or so) and some hand rails (one is actually part of the chain gaurd that will be helping to prevent the drivers from getting their fingers cut off or mangled). The seat is made of shade cloth zip-tied to 1/2" EMT. This is how some of the KSR racers do it, provides some ventalation underneath. I have decided to leather wrap the handles for a little added class (and to prevent from gripping sun heated metal). I will probably do the same for the seat bars. The handles also serve as grip points when pedaling and not steering. It is getting heavier, but I can still lift it so far....
In tank mode, the tank commander will be standing on a battery box (holding the 12v battery for lighting and sound effects) located just behind the seats. The top of the seats will probably have some kind of padded "whip-lash" bars to add support higher and prevent the commander's legs from hitting the drivers (also give a brace point for the commander). The Turret will be basically centered over the bar at the back of the seats, maybe a bit back. I am using the wheel of a 26" tire left over from when I scavenged the hub to use as the turret opening (this also will be padded). The turret itself will rotate manually on golf ball bearings contained in a track.

In tank mode, the tank commander will be standing on a battery box (holding the 12v battery for lighting and sound effects) located just behind the seats. The top of the seats will probably have some kind of padded "whip-lash" bars to add support higher and prevent the commander's legs from hitting the drivers (also give a brace point for the commander). The Turret will be basically centered over the bar at the back of the seats, maybe a bit back. I am using the wheel of a 26" tire left over from when I scavenged the hub to use as the turret opening (this also will be padded). The turret itself will rotate manually on golf ball bearings contained in a track.
Talent hits a target no one else can hit; Genius hits a target no one else can see.
Arthur Schopenhauer
Arthur Schopenhauer

Wow, that's coming right along, Jafe! Glad you enjoyed the KSR seminar. Remember everybody, the Grand Championship Kinetic Sculpture Race (all human-powered and amphibious) takes place Memorial Weekend in Humboldt County, CA. www.kineticsculpturerace.org.
(I think my 'puter works now -- it has had a major tune-up. But scanner still out.)

-
dragonfly Jafe
- Posts: 1877
- Joined: Tue Sep 02, 2003 11:08 am
- Location: the Oregon Trail


-
Tiahaar
- Posts: 1142
- Joined: Sat Sep 20, 2003 9:13 pm
- Burning Since: 2003
- Camp Name: Starship Palomino
- Location: Mojave Desert, CA (also Forever via Pandora)
Wow. I'd forgotten how heavy-duty the track systems are on battle tanks, having only seen them in museums as a kid. Makes even the cat dozers seem fairly simple and uncomplicated. Soooo, I will post a photo of my own set of puny bogie wheels for one side anyway, I had them lined up on the lawn checking spacing...they are only 8"...but are getting new electric motor quality kart bearings (with seals!) to better withstand the wind-driven playa.
I'm getting concerned about the amount of friction in my design...16 bogie wheels, 4 main sprockets, main shaft, two jack shafts, 10 shaft bearings, etc. etc...plus a right-angle gearbox and transaxle. EEp.
The transaxle is now back together & works!! The two little toothpick-looking things at the bottom of the photo are the new shift keys that went in. The pinecone of gears next to it is what accounts for all the internal friction as they all turn at different speeds right against one another with lots of grease drag...only the gear with the shift key engaged to it drives the output shaft. Very clever design!
Dang dragonfly Jafe you've got a chassis practically built already! Awesome!
Burning Man 2003-25; Desert Carillon, HypnoHorse, Ulaume's Chimes, Iron Native, Black Rock Solar, Portal Collective, Center Camp Café Stage and Sound Tech, 747 Project
Starship Palomino
Starship Palomino
-
dragonfly Jafe
- Posts: 1877
- Joined: Tue Sep 02, 2003 11:08 am
- Location: the Oregon Trail
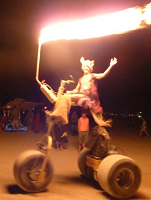
View of turret structure (handles are for manually turning the turret). The upper part is basically view ports (will not be covered). The rest will be covered by very thin aluminum sheeting riveted to washers welded to the frame. There will be a propane tank on the back, balanced by a flame gun on the front (at least if I get my flame permit - if not there will be plastic mock-ups). I hear there may even be a MG that can be mounted to the front (say to a plate welded there...)
The flame cannon controls (gas valve, ignitor, and dump lever) will be mounted at the front of the turret with the 1-1/2" pipe extending out from the center at a fixed upward angle.

(also note the tarp covered Tongue in the back ground, awaiting it's fate)
The flame cannon controls (gas valve, ignitor, and dump lever) will be mounted at the front of the turret with the 1-1/2" pipe extending out from the center at a fixed upward angle.
(also note the tarp covered Tongue in the back ground, awaiting it's fate)
Talent hits a target no one else can hit; Genius hits a target no one else can see.
Arthur Schopenhauer
Arthur Schopenhauer
-
dragonfly Jafe
- Posts: 1877
- Joined: Tue Sep 02, 2003 11:08 am
- Location: the Oregon Trail
I think maybe another MG has already been pledged for the Tank Commander's cupola when she goes into battle..the real hardpoints for Q-type weaponry will be down lower, on the foward sloped hull, and also on the side sponsons that will be covering the access portals. Plenty of space for MG's, flamethrowers, rocket pods (a pair of those for the rear would be kool), etc. The tank I am basing it on, the M5 Stuart light tank, historically had a slew of weapons (up to 3 hull MG's and a turret MG plus the main gun). Basically, I am trying to add deterants to people wanting to try to climb on the thing...(maybe I'll wrap it in barb wire). Lightweight but menacing looking spikey bits have been suggested, but I am afraid they would become MOOP.
I spent most of today buying parts and really thinking about the flame cannon. I think I have the controls and gas hose routing figured, the only part I am not sure of is the ignitor (probably use a spark of some kind - I have a piezo-style that works remotely, but I don't think that would be robust enough or last more than a few shots!). The cannon will be fixed such that it is always 7-8' above the ground (pointed at maybe a 30 degree up angle). I plan on having a few 12v lights on the turret aiming outward that define a 25' radius arc (or whatever is needed) to aid the Tank Cammander in knowing when it is safe to fire. I wish they mad a laser level with a variable radius function...
I estimate the blast will be about 100 cubic inches of propane at 90 psi (or maybe less as the pressure will be regulated). Anyone know how to calculate a fireball size from that? I am hoping for 3-4 feet at least....
Talent hits a target no one else can hit; Genius hits a target no one else can see.
Arthur Schopenhauer
Arthur Schopenhauer
.
I was just in Idaho, so I thought of Jafe and on the way back I "mentally invented" a cannon that would use shotgun-primers to blow a puff of talkum powder out the barrel. I guess that proves that I have not been to BM yet! Propane-fireballs over my head. I'll wear my hair extra short!
Q: I probably know this, but my mind is blank: Jafe, what are you using for tubing on that chassis? Electrical conduit? Welder -- wire feed?
-
StevenGoodman

- Posts: 474
- Joined: Sun Dec 18, 2005 11:52 pm
- Location: Top Secret - be eaten after entering
[quote="dragonfly Jafe"]
I spent most of today buying parts and really thinking about the flame cannon. I think I have the controls and gas hose routing figured, the only part I am not sure of is the ignitor (probably use a spark of some kind - I have a piezo-style that works remotely, but I don't think that would be robust enough or last more than a few shots!).[/quote]
Last year Dance Dance Immolation decided to go with Pilot Lights, instead of ignitors. We had built ignitors out of ignition coils, but there was some problem. (The problem may have been with the coils interfering with all the electronics and safety systems.)
I can ask Sunday evening, we are having a meeting.
-
dragonfly Jafe
- Posts: 1877
- Joined: Tue Sep 02, 2003 11:08 am
- Location: the Oregon Trail
I am using 1" EMT (electrical metal tubing) for the main chassis, 3/4" EMT for the stuff I am not sure off, and 1/2" EMT for everything else. MIG welder on a low setting (multiple passes where it goes to heavier stuff) - (and holding my breath in a futile attempt to avoid the vaporized tin,etc).
This is mild steel. I am a little concerned about the flex, but so far the weight is right on (I lifted the entire chassis w/ turret today, I would estimate maybe 150 lbs). I plan on lots of triangular bracing.
I would prefer chrome moly or aircraft aluminum, maybe that will be mk.II
I am ordering my last sprockets tomorrow. Can't wait to see if 1-2 slaves can make it go....
If not, it's 9 hp of pure gasoline where it will do the best...
Talent hits a target no one else can hit; Genius hits a target no one else can see.
Arthur Schopenhauer
Arthur Schopenhauer
-
dragonfly Jafe
- Posts: 1877
- Joined: Tue Sep 02, 2003 11:08 am
- Location: the Oregon Trail
Yeah, the fumes are a bitch. I considered a breathing rig, but so far think by holding my breath and moving away after each weld before breathing in I am minimizing my exposure (I guess time will tell). Sanding it definetaly helps (especially in getting a good pool started), but I have been kind of cheating lately by just allowing the arc to burn it off and then form the pool. Seems to be working so far...I had a heck of a time when I had to remove two pieces yesterday that I put in the wrong spot...Elliot wrote:.
Right. Please try real hard not to breathe the fumes from the galvanizing. Some people sand it away before they weld. Other than that, EMT ("conduit") is great stuff.
I'll honk and wave if I drive thru Idaho again -- I'm on my way out the door.
Talent hits a target no one else can hit; Genius hits a target no one else can see.
Arthur Schopenhauer
Arthur Schopenhauer
-
Lassen Forge

- Posts: 5320
- Joined: Tue Feb 22, 2005 9:35 pm
- Location: Where it's always... Wednesday. Don't lose your head over it.
The old welders trick of drinking milk will help kill the queasy feeling from breathing galvy fumes...
Of course, it prolly doesn't do much for the heavy metal poisoning... but you survive the immediate aftereffects. Something in there counteracts whatever the burning zinc does to your bod... Don't know what or how or why...
but I know firsthand it works.
bb
Of course, it prolly doesn't do much for the heavy metal poisoning... but you survive the immediate aftereffects. Something in there counteracts whatever the burning zinc does to your bod... Don't know what or how or why...
but I know firsthand it works.
bb
-
capjbadger
- Posts: 2691
- Joined: Sun Jun 19, 2005 1:17 am
- Burning Since: 2005
- Camp Name: Lamplighters
- Location: Horus' Left Armpit
Actualy its the vaporized zinc you want to avoid that's coming of the galv. Nasty nasty stuff.dragonfly Jafe wrote: (and holding my breath in a futile attempt to avoid the vaporized tin,etc)
'Typical “metal fume fever” begins about 4 hours after exposure, and full recovery occurs within 48 hours. The symptoms include fever, chills, thirst, headache and nausea. All of these symptoms, pain and suffering, as well as lost work (and play) time, can be avoided entirely by simply not inhaling the zinc oxide fumes. This can easily be done using any of the methods described later.'
Arrrggg!! Avast ye fucking fluffy bunny shirtcockers! Haul your drunken hairy fat ass out of our sight or prepare to receive a hot buttered hedgehog fired up your aft quarters!
Honey Badger don't care. Honey Badger don't give a shit!
Honey Badger don't care. Honey Badger don't give a shit!
-
dragonfly Jafe
- Posts: 1877
- Joined: Tue Sep 02, 2003 11:08 am
- Location: the Oregon Trail
thanks for the encouragement that I probably am not poisoning myself. It has been in the back of my mind, but the first whif or two of that shit was all I needed to know it was some bad stuff. I have yet to experience anything (besides a hand burn last week) negative, so I'm guessing I'm OK. All that fritted lead I once uncovered in a college art drawer or the vial of Carbon-14 I spilled on my foot probably did far more damage...
Just to make it clear tho' - welding EMT is hazardous, as the zinc used to make it rust proof (galvanized) vaporizes during the welding process (this coating also makes getting good welds harder). Breathing vaporized zinc (like most any heavy metal) is not good. I knew all this before I started, am doing everyting outside, and take extra steps to avoid breathing the crap. Anyone else welding EMT should do be aware of what they are doing...
Just to make it clear tho' - welding EMT is hazardous, as the zinc used to make it rust proof (galvanized) vaporizes during the welding process (this coating also makes getting good welds harder). Breathing vaporized zinc (like most any heavy metal) is not good. I knew all this before I started, am doing everyting outside, and take extra steps to avoid breathing the crap. Anyone else welding EMT should do be aware of what they are doing...
Talent hits a target no one else can hit; Genius hits a target no one else can see.
Arthur Schopenhauer
Arthur Schopenhauer

-
dragonfly Jafe
- Posts: 1877
- Joined: Tue Sep 02, 2003 11:08 am
- Location: the Oregon Trail
I may be buying a small milling machine, found a combo drill/mill press for $300 that would fit into the corner of my existing shed and do the limited stuff I need to do. It's a hobby rig, and probably crap, but good enough for the end of the world tank korps...I just have to convince myself that all those slots would be worth it...LeChatNoir wrote:[bad infulence] And it sounds to me like, with such costly parts, you could justify buying a lathe and milling machine... [/bad influence]
Talent hits a target no one else can hit; Genius hits a target no one else can see.
Arthur Schopenhauer
Arthur Schopenhauer